---
title: "TinyMCE AI on-premises: editor-side integration"
description: "Connecting the TinyMCE editor to the on-premises AI service from React, Vue, Angular, Svelte, or vanilla JavaScript."
canonical_url: "https://www.tiny.cloud/docs/tinymce/latest/tinymceai-on-premises-frameworks/"
md_url: "https://www.tiny.cloud/docs/tinymce/latest/tinymceai-on-premises-frameworks/index.md"
version: "latest"
last_updated: "2026-05-28T04:31:35Z"
tokens: 2897
---
# TinyMCE AI on-premises: editor-side integration
This page covers the **editor-side** configuration — the final step that connects the browser-based TinyMCE editor to the running AI service. At this point in the deployment process, the [data layer](../tinymceai-on-premises-database/), [LLM providers](../tinymceai-on-premises-providers/), and [JWT token endpoint](../tinymceai-on-premises-jwt/) are already operational. This page wires the editor to that infrastructure.
It assumes:
- The AI service is already running and reachable from the browser (see [Getting started](../tinymceai-on-premises-getting-started/)).
- A token endpoint exists that signs HS256 JWTs (see [JWT authentication](../tinymceai-on-premises-jwt/)).
- A valid TinyMCE license key or API key with the AI feature enabled.
For general framework setup (installing wrappers, component structure), see the existing integration guides:
- [React](../react-cloud/)
- [Vue.js](../vue-cloud/)
- [Angular](../angular-cloud/)
- [Svelte](../svelte-cloud/)
The on-premises AI integration adds the options documented below to the standard TinyMCE `init` configuration.
## Token flow
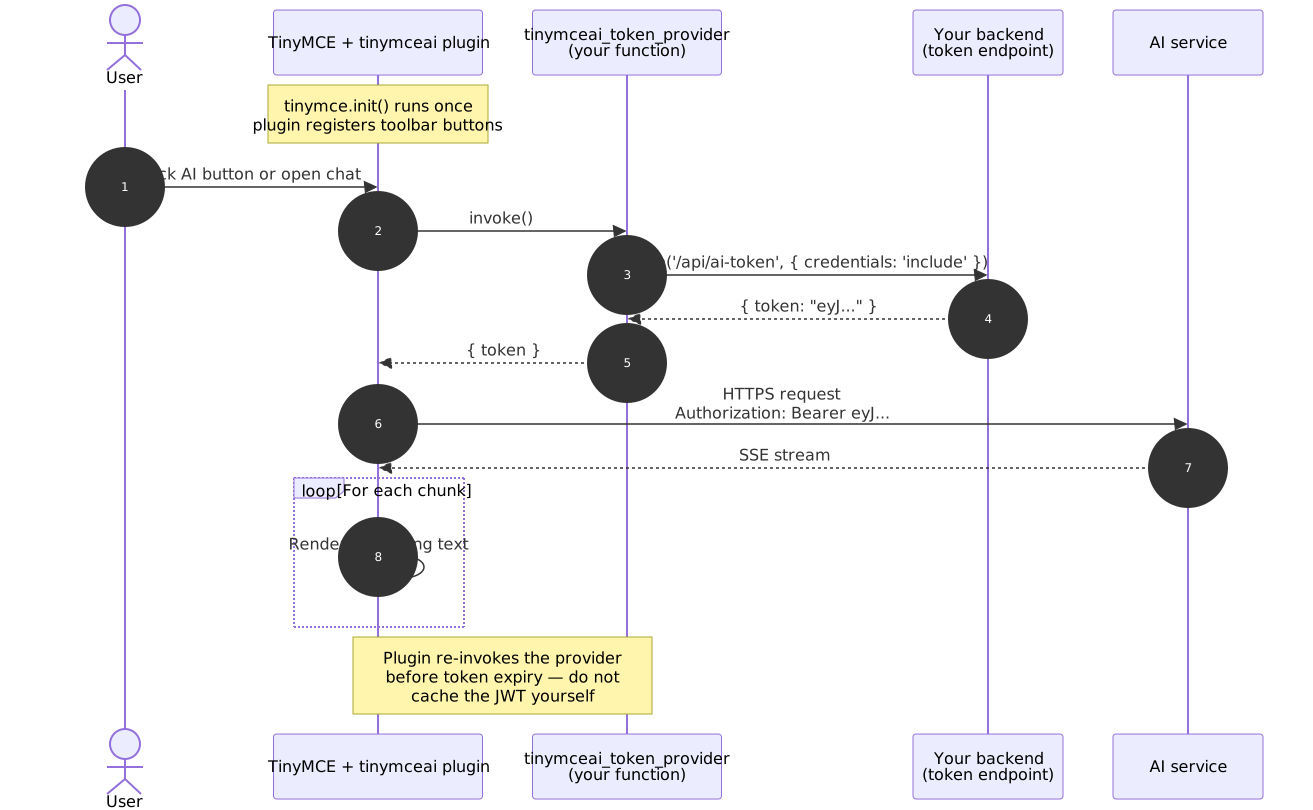
The plugin calls the token provider on initialization and again before the cached token expires. The application back end authenticates the browser request through its own session layer, signs an HS256 JWT with the API Secret, and returns it. The plugin then sends the JWT to the AI service with every request.
## Required editor options
| Option | Description |
| --- | --- |
| `plugins` | `tinymceai`. |
| `toolbar` | Include one or more of `tinymceai-chat`, `tinymceai-review`, `tinymceai-quickactions`. |
| `tinymceai_service_url` | The origin of the AI service (no trailing slash, no path), for example `https://ai.yourcompany.com`. |
| `tinymceai_token_provider` | A function returning `Promise<{ token: string }>`. See [`tinymceai_token_provider`](#token-provider) below. |
## Minimal example
The following vanilla JavaScript example contains every on-premises-specific option. The same `init` options apply identically inside the React, Vue, Angular, and Svelte wrapper components.
```html
```
Replace `/path/to/tinymce/` with the location of the self-hosted TinyMCE assets. See [Self-hosted installation](../installation/) for download and setup instructions.
## `tinymceai_token_provider`
A function that returns a `Promise` resolving to an object with a `token` property containing the JWT string.
Expected return shape
```javascript
{ token: 'eyJhbGciOiJIUzI1NiIs...' }
```
Example provider
```javascript
tinymceai_token_provider: () => {
return fetch('/api/ai-token', { method: 'POST' })
.then((r) => r.json())
.then((data) => ({ token: data.token }));
}
```
| Behavior | Detail |
| --- | --- |
| Automatic refresh | The plugin calls the provider on initialization and again when the cached token nears expiry (60-second safety margin). Do not cache the JWT inside the provider. |
| Error handling | If the function rejects or the endpoint returns a non-OK response, the plugin surfaces an error in the editor UI. |
| Token lifetime | Tokens should be short-lived (5-15 minutes recommended). See [JWT authentication](../tinymceai-on-premises-jwt/) for signing key, payload structure, and lifetime guidance. |
## Framework-specific examples
The examples below show the minimum configuration needed to connect the TinyMCE AI plugin to the on-premises service. Each uses the framework wrapper’s `init` prop to pass the same options documented above.
### React
```jsx
import { Editor } from '@tinymce/tinymce-react';
function MyEditor() {
return (
fetch('/api/ai-token', { method: 'POST', credentials: 'include' })
.then((r) => r.json())
.then((data) => ({ token: data.token }))
}}
/>
);
}
```
### Vue.js
```html
```
### Angular
```html
```
```typescript
// app.component.ts
import { Component } from '@angular/core';
@Component({ selector: 'app-root', templateUrl: './app.component.html' })
export class AppComponent {
editorInit = {
plugins: 'tinymceai',
toolbar: 'undo redo | bold italic | tinymceai-chat tinymceai-review tinymceai-quickactions',
height: 500,
tinymceai_service_url: 'https://ai.yourcompany.com',
tinymceai_token_provider: () =>
fetch('/api/ai-token', { method: 'POST', credentials: 'include' })
.then((r: Response) => r.json())
.then((data: { token: string }) => ({ token: data.token }))
};
}
```
For general framework setup (installing wrappers, SSR configuration, bundler setup), refer to the framework integration guides linked at the top of this page. Replace `T8LK:…` with the license key from the Tiny account representative.
## Authenticating the token request
The `tinymceai_token_provider` fetches a JWT from the application back end. How that back end authenticates the browser request depends on the application architecture.
### Session cookie
If the page and the token endpoint share an origin (or a parent domain), the browser sends session cookies automatically:
```javascript
fetch('/api/ai-token', { method: 'POST', credentials: 'include' })
```
For cross-origin token endpoints, the back end must respond with `Access-Control-Allow-Origin: ` (not `*`) and `Access-Control-Allow-Credentials: true`, and the session cookie must be set with `SameSite=None; Secure`.
### Bearer header
If the application already holds a session JWT (injected at render time, or from an auth library), forward it as a header:
```javascript
fetch('/api/ai-token', {
method: 'POST',
headers: { 'Authorization': `Bearer ${sessionJwt}` }
})
```
This pattern avoids cookies entirely and works well for cross-origin setups.
## Cross-origin requests to the AI service
In production the editor page and the AI service typically run on different origins (`https://app.yourcompany.com` and `https://ai.yourcompany.com`). The AI service must respond with CORS headers that permit the editor origin; otherwise the browser blocks every request.
### Configuring `ALLOWED_ORIGINS`
Set the `ALLOWED_ORIGINS` environment variable on the AI service container to a comma-separated list of permitted editor origins (scheme + host + port):
```bash
-e ALLOWED_ORIGINS='https://app.yourcompany.com,https://staging.yourcompany.com'
```
| Behavior | Detail |
| --- | --- |
| Format | Comma-separated origins. Each entry must include the scheme (`https://`). Do not include paths or trailing slashes. |
| Default when unset | The service rejects cross-origin requests (no `Access-Control-Allow-Origin` header). Set this variable for any deployment where the editor is on a different origin. |
| Wildcard | `*` is accepted but not recommended for production. It allows any origin to call the AI service endpoints. |
| Preflight (OPTIONS) | The service handles `OPTIONS` preflight requests internally and responds with the appropriate `Access-Control-Allow-Methods` and `Access-Control-Allow-Headers`. No reverse proxy configuration is required for OPTIONS. |
| Credentials | The service responds with `Access-Control-Allow-Credentials: true` when the requesting origin matches an entry in `ALLOWED_ORIGINS`. |
### Verifying CORS
```bash
curl -i -X OPTIONS https://ai.yourcompany.com/v1/conversations \
-H 'Origin: https://app.yourcompany.com' \
-H 'Access-Control-Request-Method: POST' \
-H 'Access-Control-Request-Headers: authorization,content-type'
```
The response should include `Access-Control-Allow-Origin: https://app.yourcompany.com`. If it shows `*` or no CORS header, update `ALLOWED_ORIGINS` on the AI service container and restart.
### Common CORS mistakes
| Mistake | Fix |
| --- | --- |
| Trailing slash in origin (`https://app.example.com/`) | Remove the trailing slash. |
| Missing port for non-standard ports (`https://app.example.com:3000`) | Include the port in `ALLOWED_ORIGINS`. |
| `ALLOWED_ORIGINS` not set at all | All cross-origin requests fail silently. Add the editor origin. |
| Reverse proxy stripping `Origin` header | Configure the proxy to pass the `Origin` header to the AI service. |
## Content Security Policy (CSP)
If the application sets a `Content-Security-Policy` header, allow the AI service origin in `connect-src`:
```
Content-Security-Policy:
connect-src 'self' https://ai.yourcompany.com;
script-src 'self';
```
If using the Tiny CDN instead of self-hosted assets, also add `https://cdn.tiny.cloud` to `script-src`.
## Common integration errors
| Symptom | Likely cause | Fix |
| --- | --- | --- |
| Editor loads but no AI buttons appear | `plugins` does not include `tinymceai`, or TinyMCE is version 7.x or earlier | Add `tinymceai` to the `plugins` list and confirm the script URL uses `/tinymce/8/`. Verify the API key has the AI feature enabled. |
| `POST /api/ai-token` returns 401 | The token endpoint rejects the fetch | Confirm the fetch sends the session cookie (`credentials: 'include'`) or `Authorization` header that the back end expects. |
| AI responses hang then time out | Reverse proxy is buffering Server-Sent Events (SSE) | Disable proxy buffering. See [Production deployment](../tinymceai-on-premises-production/). |
| Browser console shows a CORS error on `/v1/conversations` | `ALLOWED_ORIGINS` does not include the editor origin | Update `ALLOWED_ORIGINS` and restart the AI service. |
| `tinymceai_token_provider` called in a tight loop | Token endpoint returns invalid JSON or non-200 | Validate: `curl -X POST http://localhost:3000/api/ai-token` should return `{"token":"eyJ..."}` with HTTP 200. |
For other issues, see [Troubleshooting](../tinymceai-on-premises-troubleshooting/).
## See also
- [Getting started](../tinymceai-on-premises-getting-started/)
- [JWT authentication](../tinymceai-on-premises-jwt/)
- [large language model (LLM) providers](../tinymceai-on-premises-providers/)
- [Production deployment](../tinymceai-on-premises-production/)
- [Troubleshooting](../tinymceai-on-premises-troubleshooting/)