---
title: "Import from Word with JWT authentication (Node.js) Guide"
description: "Guide on how to setup JWT Authentication for importing docx (Microsoft Word) files with Import from Word"
canonical_url: "https://www.tiny.cloud/docs/tinymce/latest/import-from-word-with-jwt-authentication-nodejs/"
md_url: "https://www.tiny.cloud/docs/tinymce/latest/import-from-word-with-jwt-authentication-nodejs/index.md"
version: "latest"
last_updated: "2026-03-31T06:30:06Z"
tokens: 2357
---
# Import from Word with JWT authentication (Node.js) Guide
## Introduction
Import from Word requires setting up JSON Web Token (JWT) authentication to maintain control over file security. A JWT endpoint generates and provides authorization tokens that verify submitted content is sent by authorized users, preventing unauthorized access. As a standard web services authorization solution, JWT is documented extensively at [https://jwt.io/](https://jwt.io/).
This guide provides a comprehensive walkthrough for integrating Import from Word with TinyMCE, including Import from Word functionality, by using a Node.js server for JWT token generation. It covers project setup, server configuration, and TinyMCE customization.
### What You’ll Build
Before diving into the technical details, here’s what you’ll achieve with this guide:
- A working TinyMCE editor running the Import from Word plugin
- A secure authentication system using JWT tokens
- A simple Node.js server to handle the authentication
> **Tip:** This guide is designed for developers new to JWT authentication and TinyMCE integration.
### Prerequisites
Before starting, ensure you have:
- Node.js installed on your computer (to check, run `node -v` in your terminal)
- A TinyMCE API key (get one from [TinyMCE’s website](/signup))
- Basic familiarity with the command line
> **Important:** Make sure you have your API key ready before starting. You’ll need it for both the server and client configuration.
## Quick Start Guide
### Project Setup
```bash
# Create and enter project directory
mkdir tinymce-my-app
cd tinymce-my-app
# Initialize project
npm init -y
# Install required packages
npm install express cors jsonwebtoken
```
Verify that the `package.json` file now includes the required dependencies.
### Create Project Structure
```bash
# Create the public folder for your web files
mkdir public
touch public/index.html
touch jwt.js
```
Your project should look like this:
```none
/tinymce-my-app
/public
index.html (TinyMCE webpage)
jwt.js (Server code)
package.json (Project configuration)
```
## Setup
### Generate a Public/Private Key Pair
#### Setting up JWT authentication
To set up JSON Web Token (JWT) authentication for TinyMCE Import from Word:
1. Add a public key to your Tiny Account, [login](/auth/login/).
2. Set up a JSON Web Token (JWT) Provider endpoint via [Tiny Account - JWT Keys](/my-account/jwt/)
3. Configure your TinyMCE to use the JWT endpoint.
The **Import from Word** Server requires a *public* key generated from the same *private* key that will be used on the JSON Web Token (JWT) provider endpoint. The public key(s) stored on the Import from Word Server are used to ensure that content is sent by authorized users.
There are two methods for generating and adding a public key in the JWT Keys section of the account portal:
1. Generate New Keypair at [Tiny Account - JWT Keys](/my-account/jwt/) (recommended).
2. Generate a key pair locally and Import Public Key at [Tiny Account - JWT Keys](/my-account/jwt/).
##### Generate a key pair using the Tiny Account JWT Keys page
The [Tiny Account - JWT Keys](/my-account/jwt/) page provides a "Generate New Keypair" option, providing a quick and secure way of generating the required keys. This will store a copy of the *public* key, and provide a downloadable file for both the public and private keys. Tiny does **not store** the *private* key and the key pair **cannot** be retrieved later.
##### Generate a key pair locally and add it to the account
This method involves two steps: generating the key pair locally, then adding the public key to the account portal.
###### Generate a key pair locally
When generating a key pair locally, use one of the supported algorithms.
Import from Word does not support symmetrical encryption algorithms, such as HS256. Tiny recommends using the RS256 algorithm. The following algorithms are supported:
- RS256
- RS384
- RS512
- PS256
- PS384
- PS512
For details on each of these algorithms, visit: [RFC 7518, JSON Web Algorithms (JWA) Section 3 - Cryptographic Algorithms for Digital Signatures and MACs](https://tools.ietf.org/html/rfc7518#section-3).
For instructions on generating a key pair locally, see: [Creating a private/public key pair for Tiny Cloud](../generate-rsa-key-pairs/).
###### Add a public key in the JWT Keys section of the account portal
Once a public key has been generated locally, use the "Import Public Key" option in the JWT Keys section of the account portal at: [Tiny Account - JWT Keys](/my-account/jwt/).
#### Set up a JSON Web Token (JWT) endpoint
A JSON Web Token (JWT) endpoint is a service for generating and providing authorization tokens to users. These tokens can then be used to verify that submitted content was sent by an authorized user and to prevent unauthorized access.
The following diagram shows how JWTs are used:
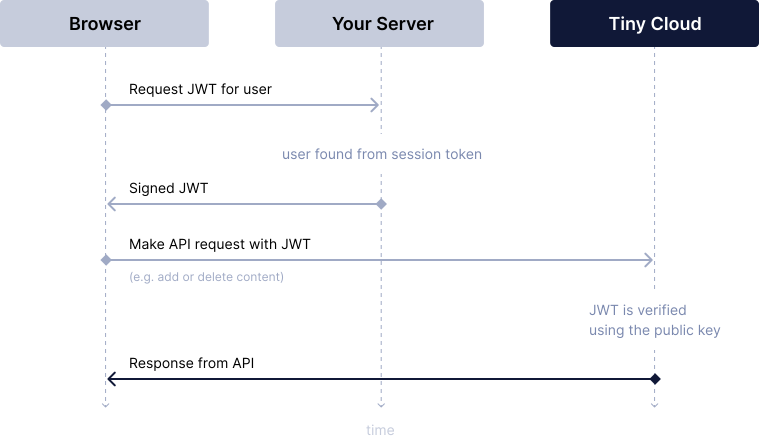
Figure 1. JSON Web Token Call Flow When a user opens Import from Word:
1. Import from Word requests a signed JWT on behalf of the user.
2. If your JWT endpoint authorizes the user, your JWT endpoint will send a JWT to Import from Word, certifying the user.
3. When the user makes a request (such as importing a document), the JWT will be sent with the request to show that the user is authorized. This JWT is verified using the *public* key stored on the Import from Word Server.
4. The Import from Word Server sends a response, indicating that content submission was successful (or unauthorized if necessary).
##### JWT endpoint requirements
A JSON Web Token (JWT) endpoint for Import from Word requires:
- The endpoint or server accepts a JSON HTTP POST request.
- User authentication - A method of verifying the user, and that they should have access to the Import from Word.
- The JWTs are generated (signed) using the *private* key that pairs with the *public* key provided to [Tiny Account - JWT Keys](/my-account/jwt/).
- The endpoint or server produces a JSON response with the token. Import from Word will submit the token with requests to the Import from Word Server.
##### Required JWT claims for Import from Word
JSON Web Tokens produced by the JWT endpoint must include the following claims:
`aud` *(required)* **Type:** `String`
The `aud` is case-sensitive string that must match a valid API key that has the Import from Word plugin enabled.
`iat` *(required)* **Type:** `Number`
The `iat` represents the issue timestamp, specified as the number of seconds. For example, to set the issue time to the current timestamp, calculate the issue time as the current timestamp divided by 1000.
Example
```json
iat: Math.floor(Date.now() / 1000), // Issue timestamp
```
`exp` *(required)* **Type:** `Number`
The `exp` represents the expiration timestamp, specified as the number of seconds. For example, to set a validity period of 10 minutes, calculate the expiration time as the current timestamp plus 600 seconds.
Example
```json
exp: Math.floor(Date.now() / 1000) + (60 * 10) // Expiration time (10 minutes)
```
### Server Setup (jwt.js)
In the root directory, copy and paste the server setup code into the `jwt.js` file.
```javascript
const express = require('express'); // Sets up the web server.
const jwt = require('jsonwebtoken'); // Generates and signs JWTs.
const cors = require('cors'); // Allows cross-origin requests.
const path = require('path'); // Handles file paths.
const app = express();
app.use(cors());
// Your private key (Replace this with your actual key)
const privateKey = `
-----BEGIN PRIVATE KEY-----
{Your private PKCS8 key goes here}
-----END PRIVATE KEY-----
`;
app.use(express.static(path.join(__dirname, 'public')));
// JWT token generation endpoint
app.post('/jwt', (req, res) => {
const payload = {
aud: 'no-api-key', // Replace with your actual API key
iat: Math.floor(Date.now() / 1000), // Issue timestamp
exp: Math.floor(Date.now() / 1000) + (60 * 10) // Expiration time (10 minutes)
};
try {
// Tokens are signed with the RS256 algorithm using your private key
const token = jwt.sign(payload, privateKey, { algorithm: 'RS256' });
res.json({ token });
} catch (error) {
res.status(500).send('Failed to generate JWT token.');
console.error(error.message);
}
});
const PORT = 3000;
app.listen(PORT, () => {
console.log(`Server running at http://localhost:${PORT}`);
});
```
### Web Page (public/index.html)
Inside the `public` folder where you created the `index.html` file add the HTML setup code.
```html
TinyMCE with Import from Word
TinyMCE Import from Word Demo
```
## Configuration Steps
### Add Your API Key
- Replace `no-api-key` in both files with your actual TinyMCE API key
- The API key should be the same in both the HTML script source and the JWT payload
### Add Your Private Key
- Replace the private key placeholder in `jwt.js` with your actual private key
- Make sure it’s in `PKCS8` format
- Keep this key secure and never share it publicly
### Running Your Project
1. Start the server:
```bash
node jwt.js
```
2. Open your browser to: `http://localhost:3000`
3. You should see:
- The TinyMCE editor
- An "Import from Word" button in the toolbar