---
title: "User interface options"
description: "Configure the editor's appearance, including menu and toolbar controls."
canonical_url: "https://www.tiny.cloud/docs/tinymce/5/editor-appearance/"
md_url: "https://www.tiny.cloud/docs/tinymce/5/editor-appearance/index.md"
version: "5"
last_updated: "2024-04-09T10:06:54Z"
tokens: 12474
---
Important This page documents TinyMCE 5. For new projects, Tiny recommends using the latest, most up-to-date version. [See TinyMCE 8 documentation](../../latest/).
# User interface options
## `block_formats`
This option defines the formats to be displayed in the `formatselect` dropdown toolbar button and the `blockformats` menu item. Each item in the string should be separated by semi-colons and specified using the form `title=block`.
**Type:** `String`
**Default Value:** `'Paragraph=p; Heading 1=h1; Heading 2=h2; Heading 3=h3; Heading 4=h4; Heading 5=h5; Heading 6=h6; Preformatted=pre'`
### Example: Using `block_formats`
```js
tinymce.init({
selector: 'textarea', // change this value according to your html
block_formats: 'Paragraph=p; Header 1=h1; Header 2=h2; Header 3=h3'
});
```
## `branding`
Use the `branding` option to disable the " **Powered by Tiny** " link displayed in the status bar for [product attribution](/legal/attribution-requirements/).
> **Important:** Product attribution is required for free and open source users. For information on TinyMCE attribution requirements, see: [Logo & attribution requirements](/legal/attribution-requirements/).
**Type:** `Boolean`
**Default Value:** `true`
**Possible Values:** `true`, `false`
### Example: Using `branding`
```js
tinymce.init({
selector: 'textarea', // change this value according to your HTML
branding: false
});
```
## `contextmenu`
The `contextmenu` option allows you to specify which items appear on the context menu. The format of this option is a space separated list of items in a string.
The context menu option accepts three styles of item:
* Any registered menu item.
* A `"|"` pipe character to indicate a separator should be added to delineate a group of menu items.
* Context menu sections defined by a plugin (usually equal to the plugin name). Separators are automatically inserted between context menu sections.
If the same name is registered as both a context menu section and a menu item, the context menu section takes preference.
The default configuration includes the context menu sections for the following plugins: `link`, `linkchecker`, `image`, `imagetools`, `permanentpen`, `table`, and `spellchecker`.
To disable the editor’s context menu, set this option to `false`.
**Type:** `String` or `false`
**Default Value:** `'link linkchecker image imagetools table spellchecker configurepermanentpen'`
> **Note:** When the TinyMCE context menu is *enabled*, users can still access the browser context menu, including the browser spellchecker, using the `Ctrl+Right click` shortcut. However, if the `contextmenu_never_use_native` option is enabled, holding the `Ctrl` key will have no effect.
### Example: Using `contextmenu`
```js
tinymce.init({
selector: 'textarea',
plugins: 'link image table',
contextmenu: 'link image table'
});
```
For information on configuring the `contextmenu` option and creating custom context menu items [context menu examples](../contextmenu/).
## `contextmenu_avoid_overlap`
> **Note:** This feature is only available for TinyMCE 5.5 and later.
The `contextmenu_avoid_overlap` option prevents the context menu from covering (or overlapping) specific nodes within the editor. This option accepts a [CSS selector](https://developer.mozilla.org/en-US/docs/Web/CSS/CSS_Selectors). When the context menu is opened on a node that matches the specified selector, the context menu will render below the node, instead of where the click occurred. If there is not enough room in the browser window below the node, the context menu will be shown above the node.
**Type**: `String`
**Default Value**: `''`
#### Example
```js
tinymce.init({
selector: 'textarea',
contextmenu_avoid_overlap: '.mce-spelling-word'
});
```
## `contextmenu_never_use_native`
The `contextmenu_never_use_native` option allows you to prevent the browser context menu from appearing within the editor.
> **Caution:** Using this option may result in unexpected behavior when right-clicking in text areas. We advise you to consider all your options carefully before using this feature.
**Type**: `Boolean`
**Default Value**: `false`
### Example: Using `contextmenu_never_use_native`
```js
tinymce.init({
selector: 'textarea',
contextmenu_never_use_native: true
});
```
## `custom_ui_selector`
Use the **custom_ui_selector** option to specify the elements that you want TinyMCE to treat as a part of the editor UI. Specifying elements enables the editor not to lose the selection even if the focus is moved to the elements matching this selector. The `editor blur` event is not fired if the focus is moved to elements matching this selector since it’s treated as part of the editor UI.
**Type:** `String`
### Example: Using `custom_ui_selector`
```html
tinymce.init({
selector: 'textarea', // change this value according to your HTML
custom_ui_selector: '.my-custom-button'
});
...++++++
++++++
```
## `draggable_modal`
Use the `draggable_modal` option to enable dragging for [modal dialogs](#ui-components/dialog/).
**Type:** `Boolean`
**Default Value:** `false`
**Possible Values:** `true`, `false`
### Example: Using `draggable_modal`
```js
tinymce.init({
selector: 'textarea', // change this value according to your HTML
draggable_modal: true
});
```
## `elementpath`
This option allows you to disable the *element path* within the status bar at the bottom of the editor.
The element path shows the selected element and the parent elements. Clicking an element on the element path will select the element in the editor.
For example: If a paragraph element within a table is selected, the element path will show `table > tbody > tr > td > p`.
Selecting elements from the element path allows users to perform operations on blocks, such as applying formatting or copying an entire block.
**Type:** `Boolean`
**Default Value:** `true`
**Possible Values:** `true`, `false`
### Example: Using `elementpath`
```js
tinymce.init({
selector: 'textarea', // change this value according to your HTML
elementpath: false
});
```
## `event_root`
This option enables you to specify a CSS selector for an element to be used as the event root when the editor is in `inline` mode.
By default all events gets bound to the editable area. But in some implementations where the DOM gets modified you want to bind these events to a container and then delegate the events down to the right editor, based on the element ID.
**Type:** `String`
### Example: Using `event_root`
```js
tinymce.init({
selector: 'div', // change this value according to your HTML
inline: true,
event_root: '#root'
});
```
## `fixed_toolbar_container`
Use this option to render the inline toolbar into a fixed positioned HTML element. For example, you could fix the toolbar to the top of the browser viewport.
**Type:** `String`
This example takes a CSS 3 selector named `'#mytoolbar'` and renders any inline toolbars into this element.
### Example: Using `fixed_toolbar_container`
```js
tinymce.init({
selector: 'div', // change this value according to your HTML
inline: true,
fixed_toolbar_container: '#mytoolbar'
});
```
## `fixed_toolbar_container_target`
> **Note:** This feature is only available for TinyMCE 5.8 and later.
Use this option to render the inline toolbar into a fixed-positioned HTML element by passing a `HTMLElement` directly to the option. This option is similar to the [`fixed_toolbar_container` option](#fixed_toolbar_container), which accepts a CSS selector.
> **Important:** `fixed_toolbar_container` has precedence over `fixed_toolbar_container_target`, so in order for `fixed_toolbar_container_target` to work, do not use the `fixed_toolbar_container` option.
**Type:** `HTMLElement`
### Example: Using `fixed_toolbar_container_target`
```js
var el = document.createElement('div');
document.body.appendChild(el);
tinymce.init({
selector: 'textarea', // change this value according to your HTML
inline: true,
fixed_toolbar_container_target: el
});
```
## `font_formats`
This option defines the fonts to be displayed in the `fontselect` dropdown toolbar button and the `fontformats` menu item. Each item in the string should be separated by semi-colons and specified using the form of: `title=font-family`.
**Type:** `String`
**Default Value:**
```js
`'Andale Mono=andale mono,times; Arial=arial,helvetica,sans-serif; Arial Black=arial black,avant garde; Book Antiqua=book antiqua,palatino; Comic Sans MS=comic sans ms,sans-serif; Courier New=courier new,courier; Georgia=georgia,palatino; Helvetica=helvetica; Impact=impact,chicago; Symbol=symbol; Tahoma=tahoma,arial,helvetica,sans-serif; Terminal=terminal,monaco; Times New Roman=times new roman,times; Trebuchet MS=trebuchet ms,geneva; Verdana=verdana,geneva; Webdings=webdings; Wingdings=wingdings,zapf dingbats'`
```
### Example: Using `font_formats`
```js
tinymce.init({
selector: 'textarea', // change this value according to your HTML
toolbar: 'fontselect',
font_formats: 'Arial=arial,helvetica,sans-serif; Courier New=courier new,courier,monospace; AkrutiKndPadmini=Akpdmi-n'
});
```
## `fontsize_formats`
This option allows you to override the font sizes displayed in the `fontsizeselect` dropdown toolbar button and the `fontsizes` menu item. Each item in the string should be space or comma-separated and include units.
**Type:** `String`
**Default Value:** `'8pt 10pt 12pt 14pt 18pt 24pt 36pt'`
### Example: Using `fontsize_formats`
```js
tinymce.init({
selector: 'textarea', // change this value according to your HTML
toolbar: 'fontsizeselect',
fontsize_formats: '8pt 10pt 12pt 14pt 16pt 18pt 24pt 36pt 48pt'
});
```
## `height`
**height** sets the height of the entire editor, including the menu bar, toolbars, and status bar.
> **Note:** If a number is provided, TinyMCE sets the height in pixels. If a string is provided, TinyMCE assumes the value is valid CSS and sets the editor’s height as the string value. This allows for alternate units such as `%`, `em`, and `vh`.
**Type:** `Number` or `String`
### Example: Using `height`
```js
tinymce.init({
selector: 'textarea', // change this value according to your HTML
height: 300
});
```
## `icons`
The **icons** option allows the editor icons to be extended or replaced using an icon pack. For information on creating icon packs, see: [Create an icon pack for TinyMCE](../creating-an-icon-pack/).
**Type:** `String`
On initialization, TinyMCE will try to load any icon pack specified by the **icons** option. The icons in the icon pack will be merged with [TinyMCE’s default icons](../editor-icon-identifiers/) and icons in the icon pack will overwrite the default icons with the same identifier.
TinyMCE loads icon packs from the path `TINYMCE_BASE/icons/${iconPackName}/icons.js`;
where:
- `TINYMCE_BASE` is the TinyMCE root directory (the directory containing `tinymce.min.js`).
- `${iconPackName}` is the name of the icon pack.
To use a TinyMCE icon pack:
1. If required, create a new `icons` directory in `TINYMCE_BASE`.
2. Copy the icon pack into the `icons` directory.
3. Add the `icons` option to `tinymce.init`
### Example: Using `icons`
```js
tinymce.init({
selector: 'textarea', // change this value according to your HTML
icons: 'material' // TINYMCE_BASE/icons/material/icons.js
});
```
## `icons_url`
The **icons_url** option allows the editor icons to be extended or replaced using an icon pack. For information on creating icon packs, see: [Create an icon pack for TinyMCE](../creating-an-icon-pack/).
On initialization, TinyMCE will try to load any icon pack specified by the **icons_url** option. The icons in the icon pack will be merged with [TinyMCE’s default icons](../editor-icon-identifiers/) and icons in the icon pack will overwrite the default icons with the same identifier.
`icons_url` is used to specify the location of an icon pack when TinyMCE and the icon pack are loaded from different locations. For example: When loading TinyMCE from Tiny Cloud, the icon pack can be loaded from a different web server.
**Type:** `String`
### Example: Using `icons_url`
```js
tinymce.init({
selector: 'textarea', // change this value according to your HTML
icons_url: 'https://www.example.com/icons/material/icons.js', // load icon pack
icons: 'material' // use icon pack
});
```
## `inline`
> **Note:** This option is not supported on mobile devices.
The **inline** option allows you to specify whether TinyMCE should run in inline mode.
The inline editing mode is useful when creating user experiences where you want the editing view of the page to be merged with the reading view of the page. When in inline mode, content is edited within the element the editor was initialized on, not within an iframe. Inline editors are designed to be "hidden" until content is selected and to use the CSS styles of the page where it initializes.
**Type:** `Boolean`
**Default Value:** `false`
**Possible Values:** `true`, `false`
### Example: Using `inline`
```js
tinymce.init({
selector: '#myeditablediv', // change this value according to your HTML
inline: true
});
```
> **Note:** TinyMCE in inline mode will not initialize on the following elements: `area`, `base`, `basefont`, `br`, `col`, `frame`, `hr`, `img`, `input`, `isindex`, `link`, `meta`, `param`, `embed`, `source`, `wbr`, `track`, `colgroup`, `option`, `table`, `tbody`, `tfoot`, `thead`, `tr`, `th`, `td`, `script`, `noscript`, `style`, `textarea`, `video`, `audio`, `iframe`, `object`, and `menu`.
For more information on the differences between the editing modes, please see this page [here](#general-configuration-guide/use-tinymce-inline/).
### CSS stylesheets and inline editor content
When using TinyMCE in inline mode, the editor inherits the CSS stylesheet from the page it is embedded in.
If the editor is used in inline mode, care should be taken when using styling that depends on structures within the editor. For example, if there’s a class like this:
```css
h1 strong {
color: orange;
}
```
This would make the phrase "bold text" bold and orange in the content:
```html
= This text is *bold text* in a heading
```
If the user changed the heading to a paragraph or a different heading level, then the text color of the bold text would change for the user. While this is entirely correct behavior according to the stylesheet, it is entirely unexpected from the user’s perspective.
## lineheight_formats
> **Note:** This feature is only available for TinyMCE 5.5 and later.
This option allows you to override the line heights displayed in the `lineheight` dropdown toolbar button and the `lineheight` menu item. Each item in the string should be space separated.
**Type:** `String`
**Default Value:** `'1 1.1 1.2 1.3 1.4 1.5 2'`
### Example: Using `lineheight_formats`
```js
tinymce.init({
selector: 'textarea', // change this value according to your HTML
toolbar: 'lineheight',
lineheight_formats: '1 1.1 1.2 1.3 1.4 1.5 2'
});
```
## `max_height`
The `max_height` option has two kinds of behaviors depending on the state of the [`autoresize`](../autoresize/) plugin:
- `autoresize` OFF (Default) : Without the `autoresize` plugin, this option allows you to set the maximum height that a user can stretch the entire TinyMCE interface (by grabbing the dragable area in the bottom right of the editor interface).
- `autoresize` ON : With the `autoresize` plugin, this option sets the maximum height the editor can automatically expand to.
**Type:** `Number`
### Example: Using `max_height`
```js
tinymce.init({
selector: 'textarea', // change this value according to your HTML
max_height: 500
});
```
> **Note:** If you set the option [`resize`](#resize) to `false` the resize handle will be disabled and a user will not be able to resize the editor (by manual dragging). Note that `resize` defaults to `false` when the `autoresize` plugin is enabled.
## `max_width`
This option allows you to set the maximum width that a user can stretch the entire TinyMCE interface (by grabbing the dragable area in the bottom right of the editor interface) when using the modern theme.
> **Note:** This behavior is different than the [`autoresize`](#plugins/opensource/autoresize/) plugin, which controls the resizing of the editable area only, not the entire editor.
**Type:** `Number`
### Example: Using `max_width`
```js
tinymce.init({
selector: 'textarea', // change this value according to your HTML
max_width: 500
});
```
> **Note:** by default the [`resize`](#resize) handle does not allow horizontal dragging and giving this key a value will not result in an observable behavior.
## `menu`
This option allows you to specify which menus should appear on TinyMCE’s menu bar and the [items](#advanced/available-menu-items/) that should appear within the menus themselves.
To specify the menus that should appear on TinyMCE’s menu bar, the menu option should be provided with a JavaScript object containing a property for each menu. These properties should contain a JavaScript object themselves with properties `title` and `items`.
The `title` property should contain a string with the name of the `menu`. The `items` field should contain a space separated list of the controls that should populate the `menu`.
If you would like to group these menu items, please insert a `|` pipe character between the menu items.
**Type:** `Object`
### Example: The TinyMCE Default Menu Items
```js
tinymce.init({
selector: 'textarea', // change this value according to your HTML
menu: {
file: { title: 'File', items: 'newdocument restoredraft | preview | print ' },
edit: { title: 'Edit', items: 'undo redo | cut copy paste | selectall | searchreplace' },
view: { title: 'View', items: 'code | visualaid visualchars visualblocks | spellchecker | preview fullscreen' },
insert: { title: 'Insert', items: 'image link media template codesample inserttable | charmap emoticons hr | pagebreak nonbreaking anchor toc | insertdatetime' },
format: { title: 'Format', items: 'bold italic underline strikethrough superscript subscript codeformat | formats blockformats fontformats fontsizes align lineheight | forecolor backcolor | removeformat' },
tools: { title: 'Tools', items: 'spellchecker spellcheckerlanguage | code wordcount' },
table: { title: 'Table', items: 'inserttable | cell row column | tableprops deletetable' },
help: { title: 'Help', items: 'help' }
}
});
```
> **Note:** The default option for this setting is different for mobile devices. For information on the default mobile setting, see: [TinyMCE Mobile - Configuration settings with mobile defaults](../tinymce-for-mobile/#mobiledefaultsforselectedsettings).
If all you need is to control which menus are available and/or in what order, see the [menubar parameter](#menubar).
## `menubar`
This option allows you to specify which menus should appear and the order that they appear in the menu bar at the top of TinyMCE.
To specify the menus that should appear on TinyMCE’s menu bar, the menubar option should be provided with a space separated list of menus.
**Type:** `String` *or* `Boolean`
**Default Value:** `true`
**Possible Values:** `true`, `false`, or `string` of menus
> **Note:** The default option for this setting is different for mobile devices. For information on the default mobile setting, see: [TinyMCE Mobile - Configuration settings with mobile defaults](../tinymce-for-mobile/#mobiledefaultsforselectedsettings).
### Example: Customizing the menu bar
```js
tinymce.init({
selector: 'textarea', // change this value according to your HTML
menubar: 'file edit insert view format table tools help'
});
```
### Example: Disabling/removing the menu bar
To disable the menu bar, the menubar option should be provided a boolean value of `false`.
```js
tinymce.init({
selector: 'textarea', // change this value according to your HTML
menubar: false
});
```
If you need more control over the contents of the menus, see the [menu parameter](#menu).
## `min_height`
The **min_height** option has two kinds of behaviors depending on the state of the [`autoresize`](../autoresize/) plugin:
- `autoresize` OFF (Default) : Without the `autoresize` plugin, this option allows you to set the minimum height that a user can shrink the entire TinyMCE interface (by grabbing the dragable area in the bottom right of the editor interface).
- `autoresize` ON : With the `autoresize` plugin, this option sets the minimum height the editor can automatically shrink to.
**Type:** `Number`
### Example: Using `min_height`
```js
tinymce.init({
selector: 'textarea', // change this value according to your HTML
min_height: 100
});
```
> **Note:** If you set the option [`resize`](#resize) to `false` the resize handle will be disabled and a user will not be able to resize the editor (by manual dragging). Note that `resize` defaults to `false` when the `autoresize` plugin is enabled.
## `min_width`
This option allows you to set the minimum width that a user can stretch the entire TinyMCE interface (by grabbing the dragable area in the bottom right of the editor interface) when using the modern theme.
> **Note:** This behavior is different from the [`autoresize`](#plugins/opensource/autoresize/) plugin, which controls the resizing of the editable area only, not the entire editor.
**Type:** `Number`
### Example: Using `min_width`
```js
tinymce.init({
selector: 'textarea', // change this value according to your HTML
min_width: 400
});
```
> **Note:** By default the [`resize`](#resize) handle does not allow horizontal dragging and giving this key a value will not result in an observable behavior.
## `mobile`
This option allows you specify an alternative configuration for mobile devices. This setting allows for overriding settings specifically for mobile devices. For information on customizing TinyMCE for mobile devices, see: [TinyMCE mobile](#mobile/).
**Type:** `Object`
### Example of mobile specific configuration
This example shows how to setup a mobile section to override some of the desktop settings with mobile specific settings.
```js
tinymce.init({
selector: 'textarea',
plugins: [ 'code', 'lists' ]
mobile: {
menubar: true,
plugins: [ 'autosave', 'lists', 'autolink' ],
toolbar: [ 'undo', 'bold', 'italic', 'styleselect' ]
}
});
```
## `placeholder`
> **Note:** This feature is only available for TinyMCE 5.2 and later.
This option adds placeholder content that will be shown when the editor is empty.
> **Note:** If the editor is initialized on a `textarea` element, the placeholder attribute can be used instead.
**Type:** `String`
### Example: Using `placeholder`
```js
tinymce.init({
selector: 'textarea', // change this value according to your HTML
placeholder: 'Type here...'
});
```
## `preview_styles`
This option lets you configure the preview of styles in format/style listboxes. Enter a string with the styles that you wish to preview separated by a blankspace, or disable the preview of of all styles by setting it to `false`.
If unset the editor will preview the styles listed in the default value listed below.
**Type:** `Boolean || String`
**Default Value:** `font-family font-size font-weight font-style text-decoration text-transform color background-color border border-radius outline text-shadow`
**Possible Values:** `String`, `false`
### Example: Using `preview_styles`
No preview of styles:
```js
tinymce.init({
selector: 'textarea', // change this value according to your HTML
mode: 'textareas',
preview_styles: false
});
```
Preview of only font-size and color:
```js
tinymce.init({
selector: 'textarea', // change this value according to your HTML
mode: 'textareas',
preview_styles: 'font-size color'
});
```
## `removed_menuitems`
This option allows you to remove items from TinyMCE’s drop down menus. This is useful if you are using the [menubar](#menubar) option to set your menus rather than the more specific [menu](#menu) option.
**Type:** `String`
### Example: Using `removed_menuitems`
```js
tinymce.init({
selector: 'textarea', // change this value according to your HTML
removed_menuitems: 'undo, redo'
});
```
## `resize`
This option gives you the ability to disable the resize handle or set it to resize both horizontal and vertically. The option can be true, false or the string `'both'`. `False` disables the resize, `true` enables vertical resizing only, `'both'` makes it possible to resize in both directions horizontal and vertical.
When resizing is enabled, the editor can be resized by either:
- Clicking and dragging the resize handle in the bottom right-hand corner of the editor.
- Focusing the resize handle, and using the arrow keys. The **Up Arrow** and **Left Arrow** keys will make the editor smaller, and the **Down Arrow** and **Right Arrow** keys will make the editor larger.
### Disabling the resize
**Type:** `Boolean`
**Default Value:** `true`
**Possible Values:** `true`, `false`, `'both'`
> **Note:** The default option for this setting is different for mobile devices. For information on the default mobile setting, see: [TinyMCE Mobile - Configuration settings with mobile defaults](../tinymce-for-mobile/#mobiledefaultsforselectedsettings).
#### Example: Disabling editor resizing
```js
tinymce.init({
selector: 'textarea', // change this value according to your HTML
resize: false
});
```
### Enabling both vertical and horizontal resize
**Type:** `Boolean`
**Default Value:** `true`
**Possible Values:** `true`, `false`, `'both'`
#### Example: Enabling vertical and horizontal editor resizing
```js
tinymce.init({
selector: 'textarea', // change this value according to your HTML
resize: 'both'
});
```
## `skin`
This option allows you to specify the skin that TinyMCE should use, or `false` to not load a skin. The default skin included with TinyMCE is named "oxide".
**Type:** `String` or `Boolean`
**Default value:** `'oxide'`
**Possible Values:** the name of a skin or `false`
The name of the skin should match the name of the folder within the skins directory of TinyMCE. If the specified skin is not found, TinyMCE will not load.
```js
tinymce.init({
selector: 'textarea', // change this value according to your HTML
skin: 'oxide'
});
```
If you would like to create your own skin, please see the guide [here](#advanced/creating-a-skin/).
## `skin_url`
If you are using TinyMCE skins, this option enables you to specify the location of the skin directory. This is useful if you are loading TinyMCE from one URL, for example a CDN, while loading a skin on, say, a local server.
**Type:** `String`
### Example: Using `skin_url`
```js
tinymce.init({
selector: 'textarea', // change this value according to your HTML
skin_url: '/css/my{prodnamecode}skin'
});
```
## `statusbar`
This option allows you to specify whether TinyMCE should display the status bar at the bottom of the editor.
The statusbar includes the [`elementpath`](#elementpath), [`wordcount`](#plugins/opensource/wordcount) and editor [`resize`](#resize).
To disable the status bar, the `statusbar` option should be provided with a boolean `false` value.
**Type:** `Boolean`
**Default Value:** `true`
**Possible Values:** `true`, `false`
### Example: Using `statusbar`
```js
tinymce.init({
selector: 'textarea', // change this value according to your HTML
statusbar: false
});
```
## `style_formats`
This option allows you to define custom items for the `styleselect` dropdown toolbar button and the `formats` menu item.
There are four types of items the array can contain:
- **Style:** The item must have a `title` and the necessary fields to [specify a new format](../content-formatting/#formattype). An optional `name` can be provided for the style, which will be prefixed with `custom-` to ensure that it does not override the default editor formats. If given a unique `name`, the style can be used with the formatting API. The item will be rendered in the UI as a clickable item that applies the given format.
- **Style reference:** The item must have a `title` and a `format` which refers to a pre-registered editor [format](../content-formatting/#formats). The item will be rendered in the UI as a clickable item that applies the given format.
- **Nested menu:** The item must have a `title` and an `items` array that contains other items that will be rendered as a sub-menu.
- **Group heading:** The item must only have a `title` and will be rendered as a non-clickable heading within the menu. This is useful for grouping items without using nested menus.
To merge custom styles with the default `styles_format` values, set [`style_formats_merge`](#style_formats_merge) to `true`.
**Type:** `Array`
**Default:**
The following is the default value for `style_formats` where it is using references to existing formats:
```js
style_formats: [
{ title: 'Headings', items: [
{ title: 'Heading 1', format: 'h1' },
{ title: 'Heading 2', format: 'h2' },
{ title: 'Heading 3', format: 'h3' },
{ title: 'Heading 4', format: 'h4' },
{ title: 'Heading 5', format: 'h5' },
{ title: 'Heading 6', format: 'h6' }
]},
{ title: 'Inline', items: [
{ title: 'Bold', format: 'bold' },
{ title: 'Italic', format: 'italic' },
{ title: 'Underline', format: 'underline' },
{ title: 'Strikethrough', format: 'strikethrough' },
{ title: 'Superscript', format: 'superscript' },
{ title: 'Subscript', format: 'subscript' },
{ title: 'Code', format: 'code' }
]},
{ title: 'Blocks', items: [
{ title: 'Paragraph', format: 'p' },
{ title: 'Blockquote', format: 'blockquote' },
{ title: 'Div', format: 'div' },
{ title: 'Pre', format: 'pre' }
]},
{ title: 'Align', items: [
{ title: 'Left', format: 'alignleft' },
{ title: 'Center', format: 'aligncenter' },
{ title: 'Right', format: 'alignright' },
{ title: 'Justify', format: 'alignjustify' }
]}
]
```
## Example: Using `style_formats`
This example shows how to append 3 new style formats.
```js
tinymce.init({
selector: 'textarea', // change this value according to your HTML
style_formats: [
{title: 'Bold text', inline: 'b'},
{title: 'Red text', inline: 'span', styles: {color: '#ff0000'}},
{name: 'my-inline', title: 'My inline', inline: 'span', classes: [ 'my-inline' ]}
],
// The following option is used to append style formats rather than overwrite the default style formats.
style_formats_merge: true
});
```
## Interactive examples
This example shows you how to:
- Override the built-in [formats](../content-formatting/#formats).
- Add some custom styles to the `styleselect` dropdown toolbar button and the `formats` menu item using the [style_formats](#style_formats) configuration option.
**Example**
```js
tinymce.init({
selector: 'textarea#format-custom',
height: 500,
plugins: 'table wordcount',
content_style: '.left { text-align: left; } ' +
'img.left { float: left; } ' +
'table.left { float: left; } ' +
'.right { text-align: right; } ' +
'img.right { float: right; } ' +
'table.right { float: right; } ' +
'.center { text-align: center; } ' +
'img.center { display: block; margin: 0 auto; } ' +
'table.center { display: block; margin: 0 auto; } ' +
'.full { text-align: justify; } ' +
'img.full { display: block; margin: 0 auto; } ' +
'table.full { display: block; margin: 0 auto; } ' +
'.bold { font-weight: bold; } ' +
'.italic { font-style: italic; } ' +
'.underline { text-decoration: underline; } ' +
'.example1 {} ' +
'body { font-family:Helvetica,Arial,sans-serif; font-size:14px }' +
'.tablerow1 { background-color: #D3D3D3; }',
formats: {
alignleft: { selector: 'p,h1,h2,h3,h4,h5,h6,td,th,div,ul,ol,li,table,img,audio,video', classes: 'left' },
aligncenter: { selector: 'p,h1,h2,h3,h4,h5,h6,td,th,div,ul,ol,li,table,img,audio,video', classes: 'center' },
alignright: { selector: 'p,h1,h2,h3,h4,h5,h6,td,th,div,ul,ol,li,table,img,audio,video', classes: 'right' },
alignfull: { selector: 'p,h1,h2,h3,h4,h5,h6,td,th,div,ul,ol,li,table,img,audio,video', classes: 'full' },
bold: { inline: 'span', classes: 'bold' },
italic: { inline: 'span', classes: 'italic' },
underline: { inline: 'span', classes: 'underline', exact: true },
strikethrough: { inline: 'del' },
customformat: { inline: 'span', styles: { color: '#00ff00', fontSize: '20px' }, attributes: { title: 'My custom format'} , classes: 'example1'}
},
style_formats: [
{ title: 'Custom format', format: 'customformat' },
{ title: 'Align left', format: 'alignleft' },
{ title: 'Align center', format: 'aligncenter' },
{ title: 'Align right', format: 'alignright' },
{ title: 'Align full', format: 'alignfull' },
{ title: 'Bold text', inline: 'strong' },
{ title: 'Red text', inline: 'span', styles: { color: '#ff0000' } },
{ title: 'Red header', block: 'h1', styles: { color: '#ff0000' } },
{ title: 'Badge', inline: 'span', styles: { display: 'inline-block', border: '1px solid #2276d2', 'border-radius': '5px', padding: '2px 5px', margin: '0 2px', color: '#2276d2' } },
{ title: 'Table row 1', selector: 'tr', classes: 'tablerow1' },
{ title: 'Image formats' },
{ title: 'Image Left', selector: 'img', styles: { 'float': 'left', 'margin': '0 10px 0 10px' } },
{ title: 'Image Right', selector: 'img', styles: { 'float': 'right', 'margin': '0 0 10px 10px' } },
]
});
```
This example shows you how to edit HTML5 content such as sections and articles.
**Example**
```js
tinymce.init({
selector: 'textarea#format-html5',
height: 500,
plugins: 'visualblocks',
style_formats: [
{ title: 'Headers', items: [
{ title: 'h1', block: 'h1' },
{ title: 'h2', block: 'h2' },
{ title: 'h3', block: 'h3' },
{ title: 'h4', block: 'h4' },
{ title: 'h5', block: 'h5' },
{ title: 'h6', block: 'h6' }
] },
{ title: 'Blocks', items: [
{ title: 'p', block: 'p' },
{ title: 'div', block: 'div' },
{ title: 'pre', block: 'pre' }
] },
{ title: 'Containers', items: [
{ title: 'section', block: 'section', wrapper: true, merge_siblings: false },
{ title: 'article', block: 'article', wrapper: true, merge_siblings: false },
{ title: 'blockquote', block: 'blockquote', wrapper: true },
{ title: 'hgroup', block: 'hgroup', wrapper: true },
{ title: 'aside', block: 'aside', wrapper: true },
{ title: 'figure', block: 'figure', wrapper: true }
] }
],
visualblocks_default_state: true,
end_container_on_empty_block: true,
content_style: 'body { font-family:Helvetica,Arial,sans-serif; font-size:14px }'
});
```
## `style_formats_autohide`
This option enables auto hiding of styles that can’t be applied to the current context. For example: if a style applies only to tables, it wouldn’t be visible in the styles drop down when the caret isn’t inside a table. By default, irrelevant menu items are disabled
**Type:** `Boolean` **Default:** `false`
### Example: Using `style_formats_autohide`
```js
tinymce.init({
selector: 'textarea',
style_formats: [
{title: 'Red cell', selector: 'td', classes: 'red'},
{title: 'Red text', inline: 'span', styles: {color: '#ff0000'}}
],
style_formats_autohide: true
});
```
## `style_formats_merge`
This option allows you to set whether TinyMCE should append custom styles defined using the [`style_formats`](#style_formats) setting to the default style formats or completely replace them.
**Type:** `Boolean` **Default:** `false`
### Example: Using `style_formats_merge`
```js
tinymce.init({
selector: 'textarea', // change this value according to your HTML
style_formats: [
{title: 'Bold text', inline: 'b'},
{title: 'Red text', inline: 'span', styles: {color: '#ff0000'}}
],
style_formats_merge: true
});
```
## `theme`
> **Important:** The dedicated `mobile` theme, sometimes referred to as the **legacy mobile theme** was depreacted with the release of TinyMCE 5.1 and will be removed in TinyMCE 6.0. The `silver` theme was updated in TinyMCE 5.1 to provide an improved mobile experience.
This option allows you to specify the theme that TinyMCE should use. The default theme included with TinyMCE is called **Silver**.
The name of the theme should match the name of the folder within the themes directory of TinyMCE. If the specified theme is not found, TinyMCE will not load.
**Type:** `String`
### Example: Using `theme`
```js
tinymce.init({
selector: 'textarea', // change this value according to your HTML
theme: 'silver'
});
```
## `theme_url`
> **Important:** The dedicated `mobile` theme, sometimes referred to as the **legacy mobile theme** was depreacted with the release of TinyMCE 5.1 and will be removed in TinyMCE 6.0. The `silver` theme was updated in TinyMCE 5.1 to provide an improved mobile experience.
If you are using TinyMCE themes, this option enables you to specify the location of the theme file. This is useful if you are loading TinyMCE from one URL, for example a CDN, while loading a theme on, say, a local server.
**Type:** `String`
### Example: Using `theme_url`
```js
tinymce.init({
selector: 'textarea', // change this value according to your HTML
theme_url: '/mytheme/mytheme.js'
});
```
## `toolbar`
This option allows you to specify the [buttons](#advanced/available-toolbar-buttons/) and the order that they will appear on TinyMCE’s toolbar.
### Grouping toolbar buttons
To specify the buttons that should appear on TinyMCE’s toolbar, the `toolbar` option should be provided with a space separated list of [toolbar buttons](#advanced/available-toolbar-buttons/). To create groups within this list, please add `|` pipe characters between the groups of buttons that you would like to create.
**Type:** `String`
#### Example grouped toolbar
```js
tinymce.init({
selector: 'textarea', // change this value according to your HTML
toolbar: 'undo redo | styleselect | bold italic | link image'
});
```
> **Note:** The size of toolbar groups affects the behavior of the toolbar drawer when the `toolbar_mode` is set to `'floating'` (default value) or `'sliding'`. For more information, see: [the `toolbar_mode` setting](#toolbar_mode).
#### Adding toolbar group labels
To specify labels to the grouped buttons that appear on TinyMCE’s toolbar, the `toolbar` option should be provided with an array of objects with `name` and `items` as object properties. The `name` should be a string value that will be set as the `title` attribute on the `div` containing the toolbar group. The `items` should be an array of strings that indicate the buttons that should appear within the particular toolbar group.
**Type:** `Array`
##### Example: Adding toolbar group labels
```js
tinymce.init({
selector: 'textarea', // change this value according to your HTML
toolbar: [
{
name: 'history', items: [ 'undo', 'redo' ]
},
{
name: 'styles', items: [ 'styleselect' ]
},
{
name: 'formatting', items: [ 'bold', 'italic']
},
{
name: 'alignment', items: [ 'alignleft', 'aligncenter', 'alignright', 'alignjustify' ]
},
{
name: 'indentation', items: [ 'outdent', 'indent' ]
}
]
});
```
### Disabling the toolbar
To disable the toolbar, the toolbar option should be provided a boolean value of `false`.
**Type:** `Boolean`
**Default Value:** `true`
**Possible Values:** `true`, `false`
#### Example: Disabling the toolbar
```js
tinymce.init({
selector: 'textarea', // change this value according to your HTML
toolbar: false
});
```
### Using multiple toolbars
To specify multiple toolbars, the toolbar option should be provided with an array of space separated strings.
**Type:** `Array`
#### Example: Adding multiple toolbars
```js
tinymce.init({
selector: 'textarea', // change this value according to your HTML
toolbar: [
'undo redo | styleselect | bold italic | link image',
'alignleft aligncenter alignright'
]
});
```
Alternatively, you may specify multiple toolbars through the use of the [toolbar(n)](#toolbarn) option.
## `toolbar(n)`
This option allows you to specify the buttons and the order that they will appear on instances of multiple toolbars.
**Type:** `String`
### Example: Using `toolbar(n)`
```js
tinymce.init({
selector: 'textarea', // change this value according to your html
toolbar1: 'undo redo | styleselect | bold italic | link image',
toolbar2: 'alignleft aligncenter alignright'
});
```
Please see the [toolbar](#toolbar) configuration option for details.
## `toolbar_mode`
> **Note:** The `toolbar_drawer` option was deprecated with the release of TinyMCE 5.2. The `toolbar_drawer` option was renamed to `toolbar_mode`. This change was made to reflect the range of settings available for this option. The `toolbar_drawer` option will be removed in TinyMCE 6.0.
The `toolbar_mode` option is used to extend the toolbar to accommodate the overflowing toolbar buttons. This option is useful for small screens or small editor frames.
When the toolbar_mode is set to `'floating'` or `sliding`, the editor will move toolbar buttons to the toolbar drawer based on:
- The defined toolbar groups.
- The width of the editor.
For example. If the following toolbar configuration is wider than the editor, the items before the separator (`|`) will appear in the main toolbar and the rest will be moved to the toolbar drawer.
```js
tinymce.init({
selector: 'textarea',
toolbar: 'undo redo styleselect bold italic alignleft aligncenter alignright alignjustify | bullist numlist outdent indent'
});
```
Two situations to consider when organising the toolbar:
- When there are two or more toolbar button groups, the main toolbar will show as many complete, sequential toolbar groups as possible within the width of the editor. Any remaining toolbar button groups will be moved to the toolbar drawer.
- If the first toolbar button group is wider than the editor, the whole toolbar will be shown in the toolbar drawer.
The toolbar modes are not available when using [multiple toolbars](#usingmultipletoolbars) or the [toolbar(n)](#toolbarn) option.
**Type:** `String`
**Default Value:** `'floating'`
**Possible Values:** `'floating'`, `'sliding'`, `'scrolling'`, or `'wrap'`
> **Note:** The default option for this setting is different for mobile devices. For information on the default mobile setting, see: [TinyMCE Mobile - Configuration settings with mobile defaults](../tinymce-for-mobile/#mobiledefaultsforselectedsettings).
### Settings
The toolbar mode is specified in the `tinymce.init`. There are four toolbar modes:
- [Floating](#floating)
- [Sliding](#sliding)
- [Scrolling](#scrolling)
- [Wrap](#wrap)
#### Floating
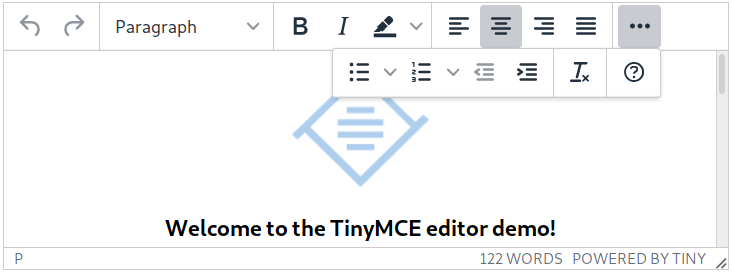
If the `toolbar_mode` is configured to `floating`, the toolbar appears under the toolbar overflow icon in a floating shelf format when the toolbar overflow icon

is clicked.
##### Configuring a Floating toolbar
Use the following settings to configure a Floating toolbar:
```js
tinymce.init({
selector: 'textarea',
toolbar_mode: 'floating'
});
```
#### Sliding
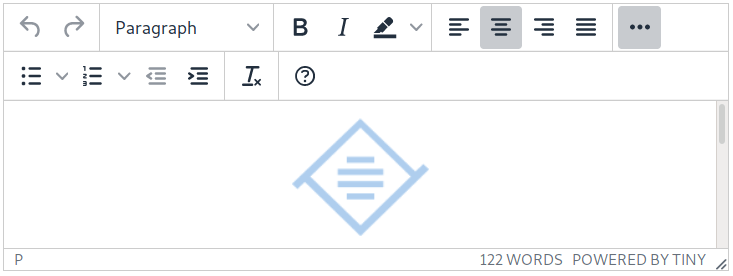
If the `toolbar_mode` is configured to `sliding`, the toolbar appears as a fixed toolbar under the first toolbar when the toolbar overflow icon

is clicked.
##### Configuring a Sliding toolbar
Use the following settings to configure a Sliding toolbar:
```js
tinymce.init({
selector: 'textarea',
toolbar_mode: 'sliding'
});
```
#### `Scrolling`
The scrolling toolbar mode is intended for touch screen devices.
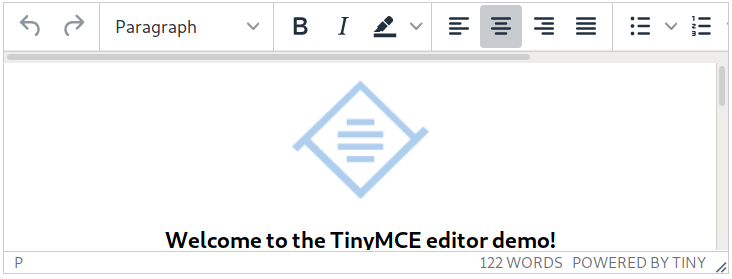
If the `toolbar_mode` is configured to `scrolling`, the overflow toolbar buttons will remain on the toolbar, but will be hidden from view. To access the overflow toolbar buttons, scroll the toolbar. To scroll the toolbar on a touch screen, use a swiping action. To scroll on a desktop device, hold shift and scroll with a mouse.
A scrollbar will be shown on the toolbar on desktop devices and hybrid devices in desktop mode.
##### Configuring a Scrolling toolbar
Use the following settings to configure a Scrolling toolbar:
```js
tinymce.init({
selector: 'textarea',
toolbar_mode: 'scrolling'
});
```
#### Wrap
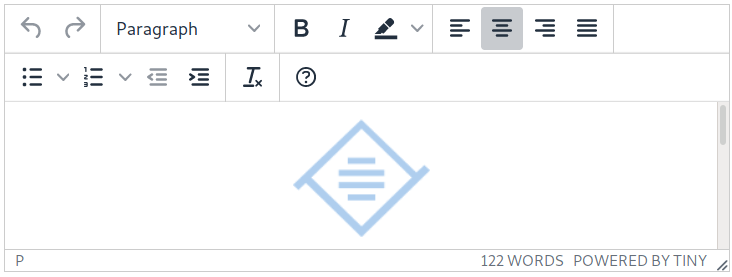
If the `toolbar_mode` is configured to `wrap`, the overflow toolbar buttons will be shown on one or more toolbars below the primary toolbar.
##### Configuring a Wrapped toolbar
Use the following settings to configure a wrapped toolbar:
```js
tinymce.init({
selector: 'textarea',
toolbar_mode: 'wrap'
});
```
## `toolbar_groups`
> **Note:** This feature is only available for TinyMCE 5.2 and later.
The `toolbar_groups` option creates a toolbar button that displays a collection of other toolbar buttons as a pop-up toolbar. The style of toolbar shown is based on the current [toolbar mode](#toolbarmode). For example, if `toolbar_mode` is set to `floating`, the toolbar group pop-up will appear in a floating shelf.
> **Note:** The `toolbar_groups` feature is *only* supported when using the `floating` toolbar mode. If the `toolbar_groups` option is used with other toolbar modes, the toolbar group button will not be displayed and a warning message will be printed in the console.
This option accepts an object, mapping the button name to the group configuration. For details on configuring toolbar groups, see: [`group toolbar button configuration`](../typesoftoolbarbuttons/#grouptoolbarbutton).
**Type:** `Object`
### Example: toolbar_groups
```js
tinymce.init({
selector: 'textarea', // change this value according to your HTML
toolbar: 'formatting | alignleft aligncenter alignright',
toolbar_groups: {
formatting: {
icon: 'bold',
tooltip: 'Formatting',
items: 'bold italic underline | superscript subscript'
}
}
});
```
## `toolbar_location`
> **Note:** This feature is only available for TinyMCE 5.2 and later.
The `toolbar_location` option is used to position the [toolbar](#toolbar) and [menubar](#menubar). The default behavior is to position the toolbar and menu bar above the content area. Setting this option to `bottom` positions the toolbar and menu bar below the content area. This option works in [classic editor](#general-configuration-guide/use-tinymce-classic/) (Iframe) mode and inline mode.
Setting this option to `auto`, positions the toolbar and menu bar either:
* Above the content area by default.
* Below the content area if there is not enough space to display the toolbar and menu bar above.
**Type:** `String`
**Default Value:** `auto`
> **Note:** `auto` was added and set as the default in TinyMCE 5.3. For TinyMCE 5.2 users, the default value is `top`.
**Possible values:** `auto`, `top`, `bottom`
### Example: Using `toolbar_location`
```js
tinymce.init({
selector: 'textarea', // change this value according to your html
toolbar_location: 'bottom'
});
```
## `toolbar_persist`
> **Note:** This feature is only available for TinyMCE 5.5 and later.
This option disables the automatic show and hide behavior of the toolbar and menu bar for inline editors. Enable this option to always show the toolbar and menu bar, and not hide them whenever focus is lost. Use this option to make the toolbar and menu bar persistent for inline editors.
**Type:** `Boolean`
**Default Value:** `false`
##### Example
```js
tinymce.init({
selector: 'div', // change this value according to your HTML
inline: true,
toolbar_persist: true
});
```
## `toolbar_sticky`
> **Note:** This feature is only available for TinyMCE 5.1 and later.
A Sticky Toolbar (or Docking Toolbar), docks the toolbar and the menu to the top of the screen when scrolling down a web page until the editor is no longer visible.
To enable Sticky Toolbars, set `toolbar_sticky` as `true` in the `tinymce.init` script. To disable Sticky Toolbars, set `toolbar_sticky` as `false`
To see a demo of sticky toolbar, see the [TinyMCE Sticky Toolbar Demo](https://codepen.io/tinymce/full/qBWLLMP).
**Type:** `Boolean`
**Default Value:** `false`
**Possible Values:** `true`, `false`
> **Note:** The default option for this setting is different for mobile devices. For information on the default mobile setting, see: [TinyMCE Mobile - Configuration settings with mobile defaults](../tinymce-for-mobile/#mobiledefaultsforselectedsettings).
### Example: toolbar_sticky
```js
tinymce.init({
selector: 'textarea', // change this value according to your HTML
toolbar_sticky: true
});
```
## `toolbar_sticky_offset`
> **Note:** This feature is only available for TinyMCE 5.9 and later.
This option allows the toolbar to stick or dock at the specified offset from the top or bottom of the [viewport](https://developer.mozilla.org/en-US/docs/Glossary/Viewport) depending on the [toolbar location (`toolbar_location`)](#toolbar_location%7D%7D). This can be useful when a site has a sticky header navigation bar, allowing the TinyMCE toolbar to "stick" below the site’s navigation bar. This option accepts a height in pixels.
> **Note:** This option requires the [`toolbar_sticky`](#toolbar_sticky%7D%7D) option be set to `true` to take effect.
**Type:** `Number`
**Default Value:** `0`
### Example: toolbar_sticky_offset
```js
tinymce.init({
selector: 'textarea', // change this value according to your HTML
toolbar_sticky: true,
toolbar_sticky_offset: 100
});
```
## `width`
Set the width of the editor.
> **Note:** TinyMCE sets the width in pixels if a number is provided. However, if TinyMCE is provided a string it assumes the value is valid CSS and simply sets the editor’s width as the string value. This allows for alternate units such as `%`, `em` and `vh`.
**Type:** `Number` or `String`
### Example: Using `width`
```js
tinymce.init({
selector: 'textarea', // change this value according to your HTML
width : 300
});
```